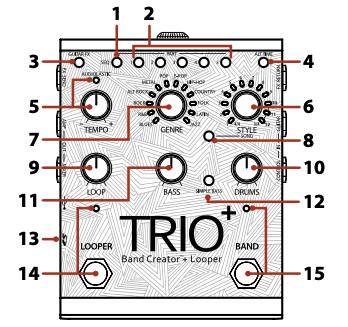
1. 시퀀스 버튼
이 버튼을 눌러 곡 시퀀스를 프로그래밍합니다. 시퀀스가 프로그래밍되면 이 버튼을 누르면 시퀀스 모드가 켜지거나 꺼집니다. 곡 시퀀스 프로그래밍에 대한 자세한 내용은 21페이지의 '곡 시퀀스 프로그래밍'을 참조하십시오 .
2. 파트 버튼
TRIO+는 최대 5개의 서로 다른 노래 파트(예: 인트로, 벌스, 코러스, 브리지 및 아웃트로)를 학습할 수 있습니다. PART 1-5 버튼은 이 5개의 파트 중에서 선택하는 데 사용됩니다. PART 버튼에는 다음과 같은 7가지 상태가 있습니다.
- 꺼짐 - 해당 부분이 학습되지 않았으며 선택되지 않았습니다.
- DimGreen - 부품이 학습 되었으며 선택 되지 않았습니다.
- 밝은 녹색 — 파티션이 선택 되었습니다.
- 흐릿한 빨간색 — 학습된 부분이 고강도로 프로그래밍되었으며 선택되지 않았습니다.
- BrightRed -Theparthasbeenlearned, isprogrammedforhighintensity는 andisselected.
- 흐릿한 황색 - 백킹 밴드가 없는 부품에 루프가 기록 되었으며 해당 부품이 선택되지 않았습니다.
- 밝은 호박색 - 백킹 밴드가 없는 부분에 루프가 기록 되었으며 선택한 부분이 있습니다.
참조 17 페이지의 '교육 악대 및 작업과 함께 노래 파트' 노래 부품에 대한 자세한 정보를 얻을 수 있습니다.
3. 기타 FX 버튼
이 버튼을 눌러 기타 신호에 내장 효과를 적용합니다. 자세한 내용은 16페이지의 '내장 기타 효과 사용'을 참조 하십시오.
4. 대체 시간 버튼
이 버튼을 누르면 선택한 노래 파트의 템포에 대한 대체 해석이 선택됩니다. 일반적으로 이것은
모호할 수 있으므로 현재 템포의 두 배 또는 절반입니다. TRIO+가 절반 또는 두 배로 적절한 템포와 마디 수를 찾지 못하면 대체 시간은 원래 타이밍과 동일하게 유지됩니다. 참조 27 페이지의 '대체 시간을 사용하여' 대체 시간 기능 사용에 대한 자세한 내용은.
5. TEMPO 노브 및 AUDIOLASTICTM LED
TEMPO 노브는 TRIO+의 전체 재생 템포를 조정하며 노래가 완료된 후 노래의 템포를 조정하도록 설계되었습니다. 참조 27 페이지의 '노래 템포 조절' 노래의 템포를 조정에 대한 자세한 내용은.
참고 : AUDIOLASTIC LED는 루퍼로 기록하기 위해 해제해야합니다. 자세한 내용은 27페이지의 '송 템포 조정'을 참조 하십시오.
6. 스타일 노브
각 장르에 사용할 수 있는 다양한 스타일 중에서 선택합니다. TRIO+가 노래 파트를 학습하면 STYLE 노브를 둘러싼 여러 색상의 LED가 켜져 선택한 장르에 따라 파트에 가장 잘 맞는 선택 항목을 표시하고 파트와 가장 잘 어울리는 스타일이 표시됩니다. 자동으로 선택됩니다. TRIO+에 파트를 가르치기 전에 원하는 특정 스타일을 "말하는" 방법도 있습니다 . 자세한 내용은 29페이지의 '스타일 사전 선택'을 참조 하십시오.
가장 밝은 STYLE LED는 현재 선택을 나타냅니다. 각 LED에 대해 2가지 가능한 색상 상태가 있으며 다음과 같습니다.
- 녹색 - 시간의 특징과 느낌(직선 스윙)이 모두 일치하는 스타일을 나타냅니다.
- 황색 - 노래의 박자와 일치하지만 다른 느낌을 주는 스타일을 나타냅니다.
모든 장르에 대해 스타일 1-9는 4/4에 있고 스타일 10-12는 3/4에 있습니다. TRIO+가 4/4에서 연주한 것을 감지하면 4/4 LED가 녹색 또는 황색으로 켜지고 3/4 LED가 꺼집니다. 노브를 돌려 3/4 LED가 켜지고 4/4 LED가 꺼지는 지점에서 3/4 스타일을 선택하여 3/4 옵션을 선택할 수 있습니다. TRIO+가 3/4에서 연주한 것을 감지하면 반대의 경우에도 마찬가지입니다.
TRIO+ 진행을 처음 가르칠 때 선택한 장르에 따라 코드 진행에 가장 적합한 스타일을 선택합니다. TRIO+ 노래를 가르칠 때 어떤 장르를 사용하는지는 중요하지 않습니다. 언제든지 장르와 스타일을 전환하여 독창적인 노래 아이디어를 기반으로 다른 그루브나 느낌을 들을 수 있습니다. 참조 33 페이지의 '장르 및 스타일을' 사용 가능한 스타일에 대한 자세한 내용은.
7. 장르 노브
선택한 곡 파트의 장르 유형을 선택합니다. TRIO+에 노래 파트를 가르치기 전이나 후에 장르를 선택할 수 있으므로 언제든지 장르를 자유롭게 실험하고 변경할 수 있습니다. TRIO+를 가르칠 새 파트를 선택하거나 새 노래를 시작할 때 장르 선택이 유지됩니다. 각 곡 파트에 대해 장르를 독립적으로 선택할 수 있습니다.
장르를 선택하면 STYLE 노브 주변의 LED가 업데이트되어 선택한 장르에 따라 노래 파트에 가장 적합한 스타일을 식별합니다. 장르를 처음 선택하면 TRIO+가 귀하의 노래를 학습한 후 TRIO+가 귀하의 연주에 가장 잘 맞는 녹색으로 표시된 스타일 중 하나를 자동으로 선택합니다. 참조 33 페이지의 '장르 및 스타일'을 사용할 수있는 장르에 대한 자세한 내용은.
8. 노래 버튼
노래 선택에 액세스하려면 이 버튼을 누르십시오. 참조 31 페이지의 '노래 관리' 로드에 대한 자세한 내용은 삭제하고, 새로운 노래를 만드는.
9. 루프 노브
믹스에서 녹음된 루프와 오버더빙의 레벨을 조정합니다. 12시 위치로 설정하면 루프 재생 레벨이 기타 입력 레벨(단일 게인)과 일치합니다.
10. 드럼 노브
믹스의 드럼 레벨을 조정합니다.
12. 베이스 노브
믹스의 베이스 레벨을 조정합니다.
13. 심플 베이스 버튼
이 버튼을 활성화하면 더 단순한 베이스 라인이 선택됩니다. 이 버튼에는 다음과 같은 3가지 상태가 있습니다.
- 꺼짐 - TRIO+는 감지된 코드에 맞는 활성 베이스라인을 연주합니다(기본 설정). 다음 바까지 유지합니다.
- 녹색 - TRIO+는 각 코드의 근음만 연주하는 단순화된 베이스라인으로 연주합니다.
- 빨간색 - TRIO+는 각 막대의 첫 번째 루트 음만 연주하는 더 단순한 베이스라인을 연주합니다.
13. microSD 카드 슬롯
TRIO+가 작동하려면 호환되는 microSD 카드(포함)가 이 슬롯에 올바르게 설치되어 있어야 합니다. 호환되는 microSD 카드가 감지되지 않으면 모든 PART 버튼이 황색으로 깜박입니다. 참조 4 페이지의 '마이크로 카드 정보를' microSD 카드 설치 및 호환성에 대한 자세한 내용은.
14. 루퍼 풋스위치 및 LED
루프와 오버더빙을 녹음하려면 이 풋스위치를 누르십시오. 루퍼 사용에 대한 자세한 내용은 22페이지의 '루프 및 오버더빙 녹음'을 참조하십시오 .
LOOPER LED는 선택한 곡 파트의 루퍼 상태를 나타냅니다. 다음 표는 LOOPER LED의 사용 가능한 상태를 설명합니다.
| 루퍼 LED | 상태 | 기술 |
| LED OFF(LED 꺼짐) | 루프가 기록되지 않았습니다 | 선택한 파트에 대해 녹음된 루프가 없고 녹음을 위해 루퍼가 준비되어 있지 않습니다. 녹음을 위해 루퍼를 준비 하려면 LOOPER 풋스위치를 누르십시오 . 루프를 녹음하려면 AUDIOLASTICTM LED가 꺼져 있어야 합니다. |
| 빠르게 깜박이는 빨간색 | 루퍼 무장 및 녹음 준비 완료 | 루퍼는 녹음을 위해 준비되어 있으며 재생을 시작할 때(루퍼가 정지된 상태에서 준비된 경우) 또는 노래 파트가 시작 부분으로 돌아갈 때(밴드 재생 중에 루퍼가 준비된 경우) 녹음이 시작됩니다. |
| 단색 밝은 빨간색 | 녹음 루프 | 루퍼가 재생 중인 것을 녹음하고 있습니다. |
| 단색 밝은 녹색 | 루프 재생 | 선택한 파트에 루프가 녹음되어 재생 중입니다. 오버더빙을 녹음 하려면 LOOPER 풋스위치를 누르십시오 . |
| 빠르게 깜박이는 호박색 | 오버더빙 녹음을 위해 무장한 루퍼 | 재생이 중지되고 루퍼가 오버더빙 녹음을 위해 준비되며 재생을 시작하면 녹음이 시작됩니다. |
| 호박색 | 오버더빙 녹음 | 루퍼가 오버더빙을 녹음하고 있습니다. 오버더빙 녹음을 중지 하려면 LOOPER 풋스위치를 누르십시오 . |
| 단색 흐릿한 녹색 | 루프 녹음 및 재생 중지됨 | 루프가 녹음되었지만 루퍼 및 밴드 재생이 중지되었습니다. BAND 풋 스위치를 누르면 이전에 입력한 설정으로 BAND와 루프 재생이 시작됩니다. LOOPER 풋스위치를 눌러 오버더빙 녹음을 준비합니다. 루프를 지우 려면 BAND 재생이 정지된 상태에서 LOOPER 풋스위치를 2초 동안 누르 십시오 . 즉시 LOOPER 풋스위치를 다시 2초 동안 누르고 있으면 지워진 루프가 복원됩니다. |
15. 밴드 풋스위치 및 LED
이 풋스위치를 누르면 TRIO+의 상태가 변경됩니다. 밴드 티칭, 밴드 시작 및 중지, 루프 재생, 밴드 클리어 등에 사용됩니다. 자세한 내용은 17페이지의 'TRIO+ 밴드 교육'을 참조 하십시오.
BAND LED는 선택한 곡 파트의 밴드 상태를 나타냅니다. 다음 표는 BAND LED의 사용 가능한 상태를 설명합니다.
| 루퍼 LED | 상태 | 기술 |
| 천천히 깜박이는 빨간색 | 밴드는 부분을 배우지 않았습니다 | 선택한 곡 부분이 아직 TRIO+에 의해 학습되지 않았습니다. BAND 풋스위치를 눌러 학습을 위해 TRIO+를 준비합니다. 루프가 이미 반주 밴드 없이 녹음된 경우 TRIO+는 노래 파트를 배울 수 없습니다. 이 경우 TRIO+가 해당 부분을 학습하기 전에 루프를 먼저 지워야 합니다. |
| 빠르게 깜박이는 빨간색 | 밴드 무장 및 학습 준비 완료 | TRIO+가 준비되어 있고 사용자가 연주를 시작하기를 기다리고 있으므로 노래 부분을 학습할 수 있습니다. |
| 단색 밝은 빨간색 | 밴드 학습 | TRIO+는 현재 노래를 배우고 있으며 TRIO+ 코드와 타이밍을 가르치기 위해 연주해야 합니다. BAND 풋스위치를 누르면 학습 단계가 중지되고 밴드 재생이 시작됩니다. 실수한 경우 BAND 풋스위치를 2초 동안 누르고 있으면 학습한 부분이 빠르게 지워져 다시 시도할 수 있습니다. |
| 단색 밝은 녹색 | 밴드 연주 | TRIO+가 노래를 재생하고 있습니다. BAND 풋스위치를 누르면 밴드 재생이 중지됩니다. 개최 BAND의 2 초 풋은 자동 재생을위한 다음 배운 부분을 대기합니다. |
| 단색 흐릿한 녹색 | 밴드 중지 | TRIO+가 선택한 곡 부분을 학습했지만 밴드 및 루프 재생이 중지되었습니다. 언론 밴드의 밴드와 루프 재생을 시작 풋 스위치를. 또는 정지된 상태에서 BAND 풋스위치를 2초 동안 누르고 있으면 선택한 파트와 루프가 지워집니다. 즉시 BAND 풋스위치를 다시 2초 동안 누르고 있으면 지워진 부분과 루프가 복원됩니다. |
1. SEQUENCE Button
Press this button to program the song sequence. Once a sequence is programmed, pressing this button will turn Sequence mode on or off. For more information on programming a song sequence, see 'Programming A Song Sequence' on page 21.
2. PART Buttons
The TRIO+ can learn up to 5 different song parts (for example, an intro, verse, chorus, bridge, and outro). The PART 1-5 buttons are used to select between these 5 parts. The PART buttons have 7 states, they are:
- Off—Theparthasnotbeenlearnedandisnotselected.
- DimGreen—Theparthasbeenlearnedandisnotselected.
- BrightGreen—Thepartisselected.
- DimRed—Theparthasbeenlearned,isprogrammedforhighintensity,andisnotselected.
- BrightRed—Theparthasbeenlearned,isprogrammedforhighintensity,andisselected.
- DimAmber—Aloophasbeenrecordedtothepartwithnobackingbandandthepartisnot selected.
- BrightAmber—Aloophasbeenrecordedtothepartwithnobackingbandandthepartisselected.
See 'Teaching The Band & Working With Song Parts' on page 17 for more information on song parts.
3. GUITAR FX Button
Press this button to apply the built-in effects to your guitar signal. See 'Using The Built-In Guitar Effects' on page 16 for more information.
4. ALT TIME Button
Pressing this button selects an alternate interpretation of the selected song part's tempo — usually this
is either double or half the current tempo since this can be ambiguous. If the TRIO+ can't find a suitable tempo and number of bars by halving or doubling, the alternate time will remain the same as the original timing. See 'Using Alternate Time' on page 27 for more information on using the Alternate Time feature.
5. TEMPO Knob & AUDIOLASTICTM LED
The TEMPO knob adjusts the TRIO+'s global playback tempo and was designed to adjust the tempo of a song after it is complete. See 'Adjusting Song Tempo' on page 27 for more information on adjusting the tempo of songs.
NOTE: The AUDIOLASTIC LED must be off to record into the looper. See 'Adjusting Song Tempo' on page 27 for more information.
6. STYLE Knob
Selects between the various styles available for each genre. Once a song part has been learned by the TRIO+, the multi-colored LEDs surrounding the STYLE knob will light to indicate which selections are the best match for the part — based on the selected genre — and the style that best matches the part will be automatically selected. Note that there is also a way to "tell" the TRIO+ that you want a certain style prior to teaching it a part — see 'Pre-Selecting A Style' on page 29 for more information.
The STYLE LED which is brightest indicates the current selection. There are 2 possible colored states for each LED, they are:
- Green—Indicatesastylewhichmatchesbothtimesignatureandfeel(straightorswing).
- Amber—Indicates a style which matches the time signature of your song, but has a different feel.
For all genres, styles 1-9 are in 4/4 and styles 10-12 are in 3/4. If the TRIO+ detects that you played in 4/4, then the 4/4 LEDs will be lit green or amber and the 3/4 LEDs will be off. You can still select 3/4 options by turning the knob to select a 3/4 style at which point the 3/4 LEDs will light and the 4/4 LEDs will go off. The same will happen in reverse if the TRIO+ detects that you played in 3/4.
The first time you teach the TRIO+ a progression it will choose the best style for your chord progression based on the genre that is selected. It doesn't matter which genre you use when teaching the TRIO+ a song. You can always switch between genres and styles at any time to hear a different groove or feel based on your original song idea. See 'The Genres & Styles' on page 33 for more information on the available styles.
7. GENRE Knob
Selects the genre type for the selected song part. Genres can be selected before or after teaching the TRIO+ your song parts, so you're free to experiment and change genres at any time. Genre selection is retained when you select a new part to teach the TRIO+ or when starting a new song. Genre selection can be made independently for each song part.
As you select genres, the LEDs around the STYLE knob will update to identify which styles are best suited for your song part based on the genre selected. When a genre is selected for the first time, after the TRIO+ learns your song, the TRIO+ will automatically choose from one of the styles shown in green that best match your playing. See 'The Genres & Styles' on page 33 for more information on the available genres.
8. SONG Button
Press this button to access song selection. See 'Managing Songs' on page 31 for more information on loading, clearing, and creating new songs.
9. LOOP Knob
Adjusts the level of your recorded loop and overdubs in the mix. When set to the 12 o'clock position, loop playback level will match the guitar input level (unity gain).
10. DRUMS Knob
Adjusts the level of the drums in the mix.
12. BASS Knob
Adjusts the level of the bass in the mix.
13. SIMPLE BASS Button
Enabling this button will select a simpler bass line. This button has 3 states, they are:
- Off—TheTRIO+willplayanactivebasslinethatfitswiththedetectedchords(thisisthedefault setting). sustaining it until the next bar.
- Green—TheTRIO+willplayasimplifiedbassline,playingonlytherootnotesofeachchord.
- Red—TheTRIO+willplayanevensimplerbassline,playingonlythefirstrootnoteofeachbarand
13. microSD Card Slot
A compatible microSD card (included) must be properly installed in this slot for the TRIO+ to operate. If a compatible microSD card is not detected, all PART buttons will flash amber. See 'microSD Card Information' on page 4 for further information on microSD card installation and compatibility.
14. LOOPER Footswitch & LED
Press this footswitch to record loops and overdubs. For more information on using the looper, see 'Recording Loops & Overdubs' on page 22.
The LOOPER LED indicates the status of the looper for the selected song part. The following table describes the available states of the LOOPER LED.
| LOOPER LED | State | Description |
| Off | Loop Hasn't Been Recorded | No loop has been recorded for the selected part and the looper is not armed for recording. Press the LOOPER footswitch to arm the looper for recording — note that the AUDIOLASTICTM LED must be off to record loops. |
| Rapidly Flashing Red | Looper Armed & Ready To Record | The looper is armed for recording and recording will begin when you start playing (when the looper is armed from a stopped state) or when the song part returns to the start (when the looper is armed during band playback). |
| Solid Bright Red | Recording Loop | The looper is recording what you are playing. |
| Solid Bright Green | Playing Loop | A loop has been recorded for the selected part and is playing back. Press the LOOPER footswitch to record overdubs. |
| Rapidly Flashing Amber | Looper Armed For Overdub Recording | Playback is stopped, the looper is armed for overdub recording, and recording will begin when you start playing. |
| Solid Amber | Recording Overdub | The looper is recording an overdub. Press the LOOPER footswitch to stop overdub recording. |
| Solid Dim Green | Loop Recorded & Playback Stopped | A loop has been recorded, but looper and band playback is stopped. Press the BAND footswitch to start band and loop playback. Press the LOOPER footswitch to arm overdub recording. Hold the LOOPER footswitch for 2 seconds to clear the loop. Immediately hold the LOOPER footswitch again for 2 seconds to restore the cleared loop. |
15. BAND Footswitch & LED
Pressing this footswitch changes the TRIO+'s state. It is used to teach the band, start and stop band and loop playback, and clear the band. See 'Teaching The TRIO+ Band' on page 17 for more information.
The BAND LED indicates the status of the band for the selected song part. The following table describes the available states of the BAND LED.
| Slowly Flashing Red | Band Hasn't Learned Part | The selected song part has not yet been learned by the TRIO+. Press the BAND footswitch to arm the TRIO+ for learning. Note that the TRIO+ cannot learn a song part if a loop has already been recorded with no backing band. In this case, the loop must first be cleared before the TRIO+ will be able to learn the part. |
| Rapidly Flashing Red | Band Armed & Ready To Learn | The TRIO+ is armed and waiting for you to start playing so it can learn your song part. |
| Solid Bright Red | Band Learning | The TRIO+ is currently learning the song and you should be playing to teach the TRIO+ the chords and timing. Pressing the BAND footswitch will stop the learning phase and begin band playback. In the event you make a mistake, holding the BAND footswitch for 2 seconds will quickly clear the learned part so you can try again. |
| Solid Bright Green | Band Playing | The TRIO+ is playing the song. Pressing the BAND footswitch will stop band playback. Holding the BAND footswitch for 2 seconds will queue up the next learned part for automatic playback. |
| Solid Dim Green | Band Stopped | The TRIO+ has learned the selected song part, but band and loop playback is stopped. Press the BAND footswitch to start band and loop playback. Or, while stopped, hold the BAND footswitch for 2 seconds to clear the selected part and loop. Immediately hold the BAND footswitch again for 2 seconds to restore the cleared part and loop. |


최근댓글